What order to put media in a freshwater sump tank
A sump tank is a great filter to use on a large freshwater aquarium due to the massive amount of media it can hold. The order in which the media is placed in the sump is important. It increases the overall efficiency of the sump and can reduce the frequency of cleaning the media.
While it may seem logical to start with the coarser mechanical filtration types first, followed by the finer media, the opposite works better in practice. Having the fine filter wool first works well at catching the small particles first before they enter the sump and the wool can be replaced easily when needed.
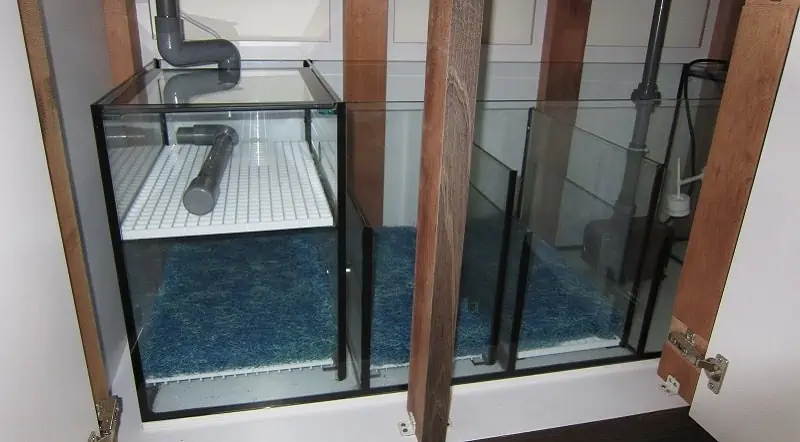
In my sump tank I start with fine filter wool followed by black filter sponge for mechanical filtration. Chemical and buffering media are added in the next section. Following this is the bio media section.
It’s important to understand the water flow pattern in your sump in order to plan your media layout. In this article, I will go through how my sump design and media arrangement.
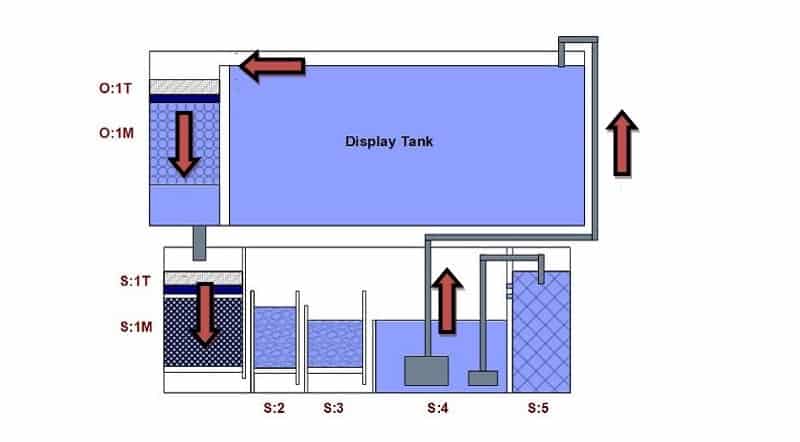
Diagram of a Freshwater Sump
In what order should the media be placed in the sump?
The Overflow Section Media Setup:
Top Section of Overflow (O:1T) : Fine filter wool and blue filter pad.
This top section is used for mechanical filtration and is critical for keeping debris and large particles from getting into the overflow area and sump. Fine filter wool should be used and it will need to be changed regularly to avoid clogging and flooding. I inspect this filter wool every week during water change and it is replaced every other month. A layer of blue filter pad is placed below the filter wool to provide some support.
Main Section of Overflow (O:1M) : Bio balls
Bio balls are the ideal media option for the main section of the overflow. The water flows through this compartment of bio balls where it is aerated and down into the sump. Bio balls require very little if any maintenance. I clean the bio balls once a year. This is the most difficult area to clean as it takes time to remove the bio balls from this section.
The Sump Tank Media Setup:
Section 1 (S:1T) : Fine filter wool with a layer of blue filter pad underneath.
Similar to the top section of the overflow I use filter wool and blue filter pad for mechanical filtration. However, the filter wool used here is the pad type. This will catch particles from entering the sump.
The wool pads are changed once every three months.
Section 1 (S:1M) : Black filter sponge.
This is a large section containing black filter sponge which provides both mechanical and biological filtration. 4 layers of black sponge are used in this section.
The sponges are cleaned once every 6 months.
Section 2 (S:2) : Oyster shells, crushed coral, bio rings, Purigen.
In this section, I have 2 bags of oyster shells and 2 bags of crushed coral to buffer the water and raise the pH. Along with 6 bags of bio rings for biological filtration and 4 packs of Purigen.
The oyster shells and crushed coral are replaced yearly to ensure the buffering capacity is maintained in the tank and the Purigen is recharged on an ad-hoc basis, once it gets brown.
Section 3 (S:3) : Seachem Pond Matrix and bio rings.
This section is all bio media. Seachem Pond Matrix is a great option as it’s easy to clean and has a big surface area for the beneficial bacteria to colonize. The difference between Pond Matrix and regular Matrix is the size of the pieces, both do the same job. It is a bit expensive so I don’t use Matrix exclusively as my bio media.
In addition to Matrix, I use sintered glass bio rings. When selecting bio rings the only criteria I have is that the media doesn’t disintegrate over time. Some brands for rings can break up and leave white particles behind when they do. The brand I use is ANS Sinopore Max Bio Ring, which comes already in a mesh bag.
All of the bio media is placed in mesh bags for easier maintenance.
Section 4 (S:4) : The Return Pump Section
This is the section into which the return pump is placed and I don’t have any media in this area. I’m using an Eihem 1264 as my return pump. I also have a smaller pump that is used to send water to the UV sterilizer and the K1 media section, mentioned below.
It is important to keep an eye on the water level in the return pump section. Any water lost from the tank due to evaporation will affect this water level. In my tank, the return pump section can lose 3 to 5 inches of water in a week. If neglected eventually the pump would run dry and be damaged. However, there would be a considerable volume of air bubbles being pumped into your tank before that happened. But it is something to keep in mind if you are going on holiday, you may need someone to top-up the tank water.
Section 5 (S:5) : K1 Media
This section was originally designed to be an auto top-up reservoir to maintain the water level in the return pump section. However, I converted it into a section for K1 media.
The K1 section is well underutilized in my sump due to it being placed in the last section. This type of media is very efficient at removing ammonia and nitrite due to the constant regrowth of young active bacteria on the media.
K1 media does not require any cleaning.
Conclusion
Sumps are a great type of filter for a large freshwater aquarium. It can be a bit confusing at first to understand the way they work and the correct arrangement of the media, not to mention the required measures to avoid flooding.
Sumps are able to hold a huge volume of mechanical, biological media. All these media are quite easy to access and change around if needed. Adding and removing chemical media such as carbon has never been easier.
It is important to use fine filter wool in the first section of the overflow and in the top section of the sump to trap the waste particles before they enter the sump. This will save a lot of effort cleaning the bio media later. Remember to check the filter wool frequently and replace it as needed.
Thanks for reading. If you found this article helpful, don’t forget to share 🙂